

Hashima Coal Mine Supported Japan’s Modernization
An overview of wartime Hashima, an enormous underground coal mine that supported Japan’s modernization, and the coal mining operation that took place there, are depicted in illustrations below. Illustrations and descriptions are taken from “The Coal Mine and the Lives of the People on Gunkanjima Through Pictures and Testimonies”, written by Einosuke Goto and Kiyoshi Matsumoto, issued by: Gunkanjima Research Club.
Characteristics of Hashima Coal Mine and its Change Over Time
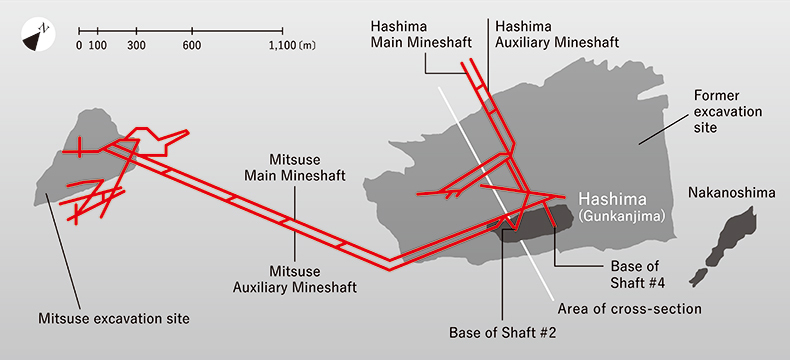
“Hashima”, a tiny island about 480 meters long (North to South) and 160 meters wide (East to West) with a periphery of 1,200m, located 19km offshore to the Southwest of Nagasaki Port, is an enormous undersea coal mine that supported Japan’s modernization.
Coal was discovered here around 1810, towards the end of the Edo Period (1603-1868), and small-scale mining ensued, but in 1890, the Mitsubishi Goshi Kaisha (Mitsubishi Limited Partnership) purchased the right of administration, and began developing it as a full-blown, modern coal mine.
Between the Meiji era (1868-1912) and the early Showa era (1926-1989), Mitsubishi constructed embankments around the island six times through land reclamation, expanding the island, and transforming what was originally just a barren shelf of aqueous rock.
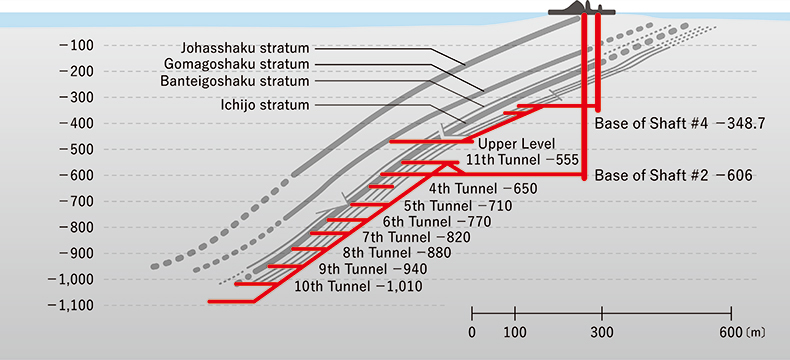
Because there is a coal seam directly below the small island, shaft mining was implemented from the beginning. Shaft #1 to Shaft #3 were opened during the Meiji era, Shaft #4 was opened during the Taisho era (1912-1926) in 1925, and in 1936, during the Showa era, Shaft #2 began operation, and by the end of the War, in August 1945, the depth of the mining gallery reached 710 meters under sea level.
The incline of the coal seam was 40~45° until approximately 600 meters under sea level, but it became steeper beyond 700 meters under sea level, where the incline exceeded 60°.
The coal at Hashima had low ash and sulfur content, making it a top-grade coking coal, which was indispensable for ironmaking. The quality of the coal was believed to be superior to that from Oyubari or Takashima. However, it had a high pulverization rate, which made spontaneous combustion more likely, and higher gas emission, which made blasts more likely also – therefore, mining in Hashima required sophisticated skill and technology.
Mining relies heavily on individual skill, so a large portion of a miner’s fixed salary was based on skill level, which was classified into 10 levels. Every year, miners took a test to improve their skills.
Miners worked in pairs, and 5 pairs formed a team; one of the pair needed to be a “Sakiyama (front-line miner, or hewer)”, a miner with a skill level of 5 or higher; the other was an “Atoyama (back-end miner, or carrier)”, a miner with a skill level of 4 or lower. The “Sekinin Sakiyama (Sakiyama in charge)”, or the on-site manager of a given job, needed to have a skill level of 9 or higher, which meant that that person was a highly skilled miner.
The population of the island grew as coal output increased. To allow more people to live on the small island, the first 7-story high-rise apartment building, made of reinforced concrete, the first of its kind in Japan, was constructed in 1916. In 1918, the 9-story Nikkyu Shataku (apartment for day laborers) followed suit.
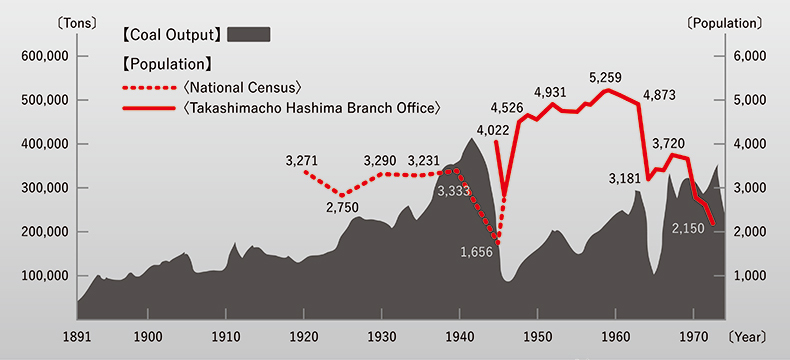
According to the national census, the population of Hashima from the Taisho era until the end of the war in the Showa era hovered around 3,300: in 1920 it was 3,271; in 1930, 3,290; and in 1940, it was 3,333.
Regarding Korean workers, there is a record that says in 1918, 70 of the 941 miners were Korean. (“Collection and Distribution of Coal in Nagasaki”, 1918, Nagasaki Board of Trade) The magazine “Fujin no Tomo” said that in 1936, there were 130 Korean miners. In 1939, to supplement the shortage of labor, a large number of Koreans were taken in. The Nagasaki Nichinichi Shimbun (Nagasaki Daily Newspaper) reported that, in the Nagasaki Prefectural towns of Hokushotanden, Sakito, Takashima, and Hashima, the total number of Koreans reached 1,500.
In 1941, the year the Pacific War started, the Hashima Coal Mine recorded the highest annual coal output of 411,100 tons. It supported the drastic increase in coal demand during the war.
“Takashima Tankoshi (Takashima Coal Mine History)”,
Mitsubishi Kogyo Semento Kabushiki Kaisha
(Mitsubishi Mining and Cement Corporation); “Living Environment on Gunkanjima (Part 2)”,
Architectural Institute Paper,
Professor Toshihide Katayose,
Nagasaki Shipbuilding University (currently Nagasaki Institute of Applied Science)
Mining in Hashima in Illustrations
Because fire was prohibited in the pits, there are almost no photographs of the pits of Hashima Coal Mine before the end of the war. Thus, below are illustrations depicting the coal mining operation.
“The Coal Mine and the Lives of the Islanders on Gunkanjima in Illustrations and Testimonies”, Einosuke Goto and Kiyoshi Matsumoto, co-authors; Issued by: Gunkanjima Research Club
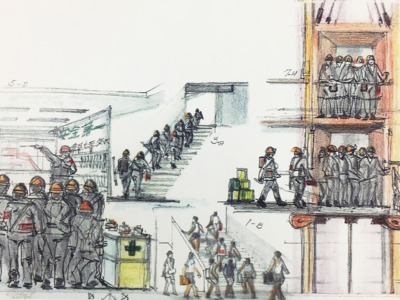
Illustration 1: Pit workers gather from their homes in the high-rise apartment buildings,
attend a meeting at the Worker Station, then climb the stairs to ride the cage
(elevator box that takes them up and down the shaft).
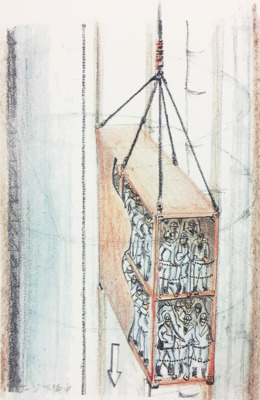
The speed of the descent is slow at the beginning and end, but faster in the middle, at 8 meters per second.
It takes a total of 3 minutes to reach the bottom of the 606m-deep shaft (diameter 6m).
(Note) The 606m-depth of the shaft almost equals the height of Tokyo Sky Tree (643m).
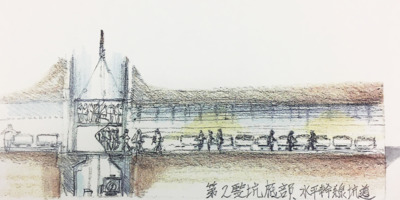
Illustration 3: After reaching the bottom of the shaft,
workers walk on the level tunnel (tunnel at the bottom of Shaft #2) for about 500m.

Illustration 4: From the level tunnel,
workers descend the slope (called Naka-oroshi) in a man-car to approach the coal face (mining site).
(Note) Note that the miners are facing backwards on the man-car.
It is said that facing front was too frightening,
and made the miners unwilling to go down the slope. It helps to imagine going downhill on a roller coaster.
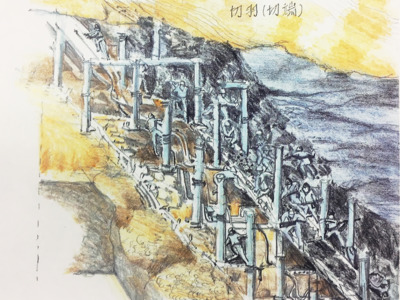
Illustration 5: Coal mining at the mine face.
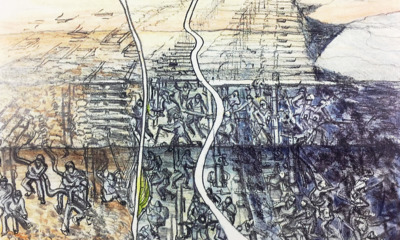
Illustration 6: Miners worked in 3 shifts per day.
After miners excavate coal during the first shift (8AM to 4PM, picture on right),
loaders load coal slack into the emptied sites during the second shift (4PM to 12AM, picture on left).
The third shift (12AM to 8AM, picture in middle) delivers materials after the loading work is completed.
(There were only 2 shifts during the war.)
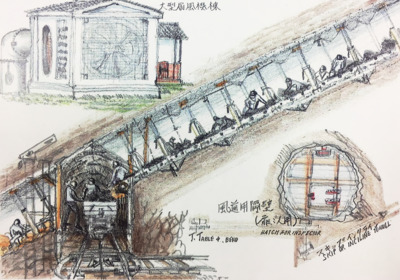
Illustration 7: Because the coal seam in Hashima was sloped, the work face was shifted on each level.
When the slope of the coal seam was steep, the work face was adjusted by a false slope (for safety).
Excavated raw coal were dropped into coal wagons (trolleys) and transported to a skip car (illustration 9).
(Note) The illustration on the bottom right shows a barrier wall for an air duct for intaking
and exhausting air to / from the pit.
The illustration on the top left shows a giant fan placed in a dedicated house for intaking and exhausting air (schema).
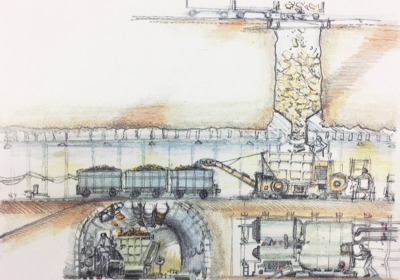
Illustration 8: Coal slack (low-quality coal or rocks) used for filling excavated sites being loaded onto dedicated trucks.
Compressed air was used to fill coal slack; the illustration at the bottom right shows machinery used for this purpose.
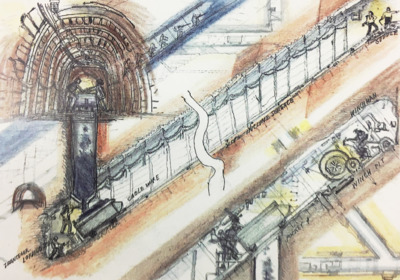
Illustration 9: Raw coal extracted from the mine face are dropped through gallery pockets and loaded onto the skip car
(the large coal truck shown at the bottom left).
From the trolley, 3 crates of raw coal are loaded to the skip car,
which is placed on one of the double tracks on the dedicated incline shaft (called Skip-Oroshi).
One track is used to transport the coal up, and the other down.
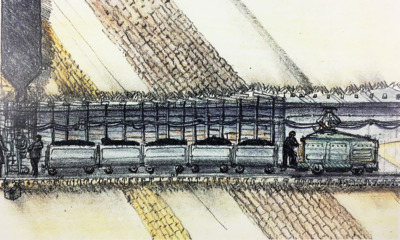
Illustration 10: Once the raw coal is brought up near the bottom of Shaft #2
(level tunnel) by the skip car, it is dropped through a pocket on the incline shaft
(by manually opening and closing the door of the pocket)
and loaded onto a trolley locomotive, which then transports the coal from the level gallery to the shaft floor.
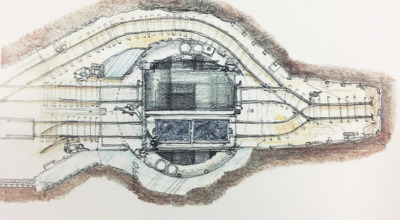
Illustration 11: View of a trolley at the shaft floor from above. Coal is placed in a cage (bottom of illustration),
which pushes out the empty trolley that comes down from the pithead.
The empty trolley that gets pushed out moves along the wall of the shaft floor and goes to the level tunnel.
(In the illustration, from right to top to left).
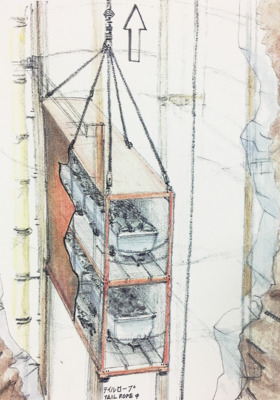
Illustration 12: Cage with coal wagons moving up the shaft
(when one cage is at the pithead, the other is at the shaft floor).
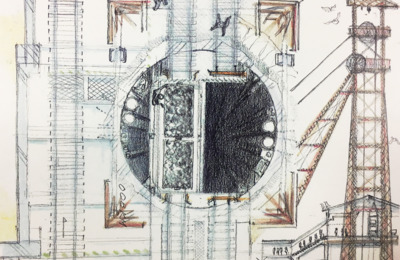
Illustration 13: A view of the cage with coal wagons at the pithead from above
(the space not filled by the cage is filled with vent pipes, compressed air pipes, electrical cables, etc.)
(Note) The illustration on the right shows the headframe of Shaft #2 with the cage at the pithead.
The two pulleys at the top of the headframe is operated by a wire rope,
which pulls the cage up and down. This maneuver requires advanced skill,
as the cage must be stopped exactly at the designated positions at the top and bottom of the pit.
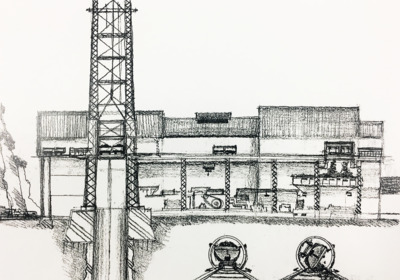
Illustration 14: The coal wagon leaving the pithead is taken to the pier.
Raw coal is taken from here to the tippler (pictured on right),
which rotates and drops the raw coal into the raw coal pocket (bottom picture).
The coal is then washed.
(Note) The chimney in the back is the chimney for the boiler.
The boiler burns the coal to boil water, which is used commercially and by households (for bathing etc).
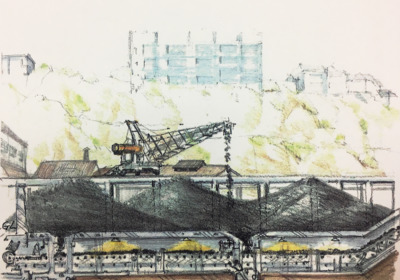
Illustration 15: Clean coal (both lump coal and fine coal. On Hashima,
most coal was fine coal) is taken to the coal storage center by a belt conveyor.
Underneath the coal storage center is a pocket and an underground belt conveyor.
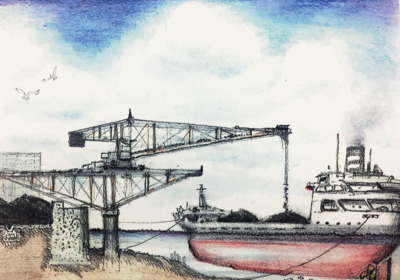
Illustration 16: Clean coal is transported from the coal storage center via the underground belt conveyor,
and loaded on to the coal cargo ship (several thousand ton class).
The coal is loaded by a distributor (the mobile, rotating loading machine shown in the illustration).